Cycling is harder than you think

A couple of weeks ago Cardio Mark ran the Dublin marathon in a very creditable time of under four hours. I’m impressed. When I used to run regularly, I once or twice managed half marathon distance and I never finished wishing I’d done twice as much. Completing a marathon requires months of training and resolute determination.

A couple of days before Mark’s marathon I went for a bike ride. I had the day to myself so cycled over to Dunkery Beacon – the highest point in South West England and the region’s signature bike climb. It’s not the longest climb and not the absolute steepest but its combination of length and severity is nonetheless testing. The rest of my ride was not without interest, extending to 93 miles with 7.5k feet of ascent and taking me around 6:40 with a couple of stops. It was equivalent in difficulty to a reasonably stiff domestic sportive. Fit cyclists do not need to train for such sportives – they’re easy enough that you can just rock up and do them.

Out of curiosity, I compared Mark’s marathon with my bike ride using Crickles Activity Charts. Charting a histogram of our heart rates gives this, with Mark’s histogram in pink lying over mine in blue:

bike_v_run

On the morning of my ride my resting heart rate was 46 bpm, which is marginally above Mark’s (44 bpm). Crickles shows our prevailing Lactate Threshold Heart Rates to be similar too (mine was 162 bpm and Mark’s was 157 bpm). The chart thus shows that not only did Mark record far fewer beats during his marathon than I did during my ride, he also managed his effort much more prudently with the entirety of his cardiac activity well under his LTHR in contrast to my ride in which I was well over my LTHR for a significant portion of the time. It is graphically evident that my ride placed a much greater load on my heart  than Mark’s marathon placed on his. This is reflected in our respective Cardiac Stress Scores – 570 for me and 300 for Mark. (Reflecting on this, I realised that the Crickles CSS methodology does not fully capture the restorative effect of my two coffee stops. I calculated the effect of these and it decreases my CSS by 17 points – just under 3%, so not a significant amount.)

By contrast, the differences in our Suffer Scores on Strava was much narrower – Mark’s Suffer Score was 255 compared to my 299. This confirms my previous finding that the Strava Suffer Score is not a good measure of cardiac stress.

There is an important point here for cyclists. Mark’s marathon felt hard and was hard because of the intense amount of corporeal stress that running for four hours places on the body. Skeletal muscle and the bones, ligaments and tendons to which it is attached, can feel the pain. There is also that intangible of “the wall” as it is harder to refuel adequately when running. Cycling inflicts far less strain on skeletal muscle and doesn’t pound our body in the same way. Unlike our peripheral muscles, our exercising heart does not feel pain and we thus have no direct real-time index of the stress to which we subject it. So long as we ride within our strength limits and eat and drink well, the wall of bodily pain that marathon runners have to run through has no analogy in cycling and there is nothing to indicate how much cardiac stress we’re accruing. The only direct evidence that our sportive was equivalent in cardiac stress to two marathons might be a histogram or a CSS number. An appreciation of this might spur us to think more seriously about the amount of recovery we need to build into our exercise schedule.

New Summary tab for the Navigator

The Crickles Navigator has a new Summary tab giving headline figures for the athlete and a comparison of each with peers. Currently, there are six figures shown in the Value column:

Period CSS shows the total Cardiac Stress Score for the period defined by the Date range. This period defaults to the last six weeks but can easily be changed in the side panel.

Period XSS extends this measure to cover also activities on Strava for which there is no heart rate data. The estimate of cardiac stress is less good than CSS, which  requires a heart rate monitor, but better than assuming that it’s zero. If you always wear a heart rate monitor CSS and XSS will be equal (though not for the peer group). If you never wear a heart rate monitor, CSS will always be zero but XSS will usually be positive.

Current LTHR is the latest Crickles estimate of your Lactate Threshold Heart Rate. (Occasionally this estimate may lag one activity behind your last effort.) This only appears if you use a heart rate monitor.

Current Fitness, Fatigue and Form are as described here. Since they are current estimate, neither these values nor Current LTHR change as you change the Date Range.

The numbers alongside these in the Crickles Percentile column show how you compare to the Group chosen in the side panel (by default, the entire Crickles population). If the Crickles Percentile is 100 you have the highest value. If the Crickles Percentile is 50 you’re on the median.

By design, this tab works particularly well on the iPhone.

IMG_3356

Over time, we may add more information to this tab.

NB: There is a known bug that the Summary tab will be totally blank (i.e. no data) if you have included the character “(” in your Strava name. If this affects you and you’re interested in seeing your Summary data before I otherwise get round to fixing it, please let me know!


Improved layout for the Timeline

The Timeline (previously called CSS (Cardiac Stress Score) Map) on the Crickles Navigator has been overhauled to display data differently. Now, the x-axis is the timeline, which still reflects the Date Range on the side panel, and the y-axis shows the CSS for each activity. This makes it easy to pick out which activities have the highest CSS (those that lie highest on the chart) and when you did them (more recent to the right, least recent to the left). The composition of CSS into its elements is now encoded through size, which represents moving time – larger dots are longer activities – and colour – the least intense activities are green and the most intense are red.

Here’s an illustration – note that CSS Map now appears as Timeline as the tab name:

CSSMap.png

In this example, the activity with the highest CSS occurs half way along the chart at the top. The size (large) and colour (medium orange) indicates that the activity was long in duration but only moderately intense.

You will also see that there are some grey dots. This is because the Timeline now also includes activities for which there is no heart rate data and so Cardiac Stress has to be estimated from moving time alone.

Changes to the Navigator

There are a few improvements to the Crickles Navigator:
Athlete selection
It now remembers who you are (i.e. which athlete you selected) between sessions. This is achieved using a cookie (it simply stores the athlete ID); the first time you load the Navigator following this change there is a notification that pops up alerting you to the use of cookies. The cookie will periodically expire but in the main you’ll now no longer have to find your own name in the Athlete list.
The same has been done on Crickles Charts too.
Group selection
Group selection is now under Athlete selection so that you only have to select from the groups to which you belong. For the majority of athletes, this reduces to a choice between “All” athletes (the default) and Male or Female.
LTHR and FTP
Lactate Threshold Heart Rate (LTHR) and Functional Threshold Power (FTP) are now charted on separate tabs. This makes changes in LTHR in particular easier to discern. Obviously if you don’t cycle with a power meter you won’t get an FTP chart.
Last loaded date/time
The notice of when Navigator data was last updated was previously given in the arcane UTC timezone beloved of computers. This is now changed to London time.
Please let us know if you have issues with any of the above.

“All-in” analysis on the Navigator

CSS is a great measure of Cardiac Stress and, quite naturally, it relies on the athlete wearing a heart rate monitor (HRM) during exercise. However, sometimes we exercise without a HRM and sometimes we want this to “count” towards our overall accrued CSS. This is recognised in the Fit-Fat tab, which makes an estimate of CSS even for activities in which a HRM is not used.

This same estimation methodology has been extended to give an estimate of CSS its components; this is shown on a new All-in tab. Here, you can see four charts:

First, an estimate of CSS that takes into account all activities recorded on Strava, even those where an HRM was not used:

full_css_estimate

Here, the purple mass (technically, a density plot) shows the distribution of estimates amongst all Crickles athletes over the chosen period. We can see in this example that the most common value is at about 2,500, there are quite a few athletes (around 1/5th of the number at 2,500) at 5,000 and even a blip indicating one athlete over 20,000.

The vertical black line picks out the value for the chosen athlete (me in this example), and you can see that in this case the athlete (me) is bang on the most common value.

If an athlete wears an HRM all the time the estimate of CSS will be as good as we can get. Conversely, to the extent that an HRM is not used the quality of the estimate will decline. The second chart shows this quality for the given athlete over the chosen period:

estimate_quality

Again, the purple mass is a density plot showing where Crickles athletes overall lie on the quality chart. Happily, the most common value is at over 90%. About 1/6th of the number at this high value are at zero, indicating that they didn’t use an HRM at all over this period. Again, the vertical black line represents the chosen athlete and again it’s me. I’m at about 87.5% usage. To verify consistency, you can multiply this percentage (87.5%) by the CSS estimate (2,500) we just saw and that will show the CSS that you see on the Relative CSS tab (about 2,188).

Very thoughtful readers may correctly spot that when you’re on a bike with a power meter Crickles is able to give a high quality estimate of CSS even in the absence of a HRM. This is indeed true but this is not reflected on this quality chart.

The third and fourth charts show the components of the full CSS estimate. These are Intensity:

intensity

and average weekly exercise hours:

weekly_hours

The Intensity estimate is subject to the same estimate quality as the full CSS estimate (more HRM usage -> a better estimate) whereas the weekly exercise hours are a simple sum of “moving times” and are unaffected by HRM (non-)usage.

These charts work the same way as the others: for example, the most common weekly exercise time amongst Crickles users over this period is shown by the last chart to be five hours (the peak of the purple mass) and I did fractionally more than that (the vertical black line).

Seasonal time in Zones

The Seasonal tab has now been re-introduced to the Navigator. Now it shows you your time in each heart rate zone for each of the last eight Quarters (subject to your Strava history going back that far). This enables you to see whether you really were base building over the winter and adding intensity in the early season – or doing whatever your training plan called for. It also makes it easy to compare your quarter-by-quarter efforts with those from a year ago.

mseason

The definition of the zones (Z1 to Z5c) are essentially the same as those defined by Joe Friel in articles that can be found online. The main difference from those and similar methodologies is that the Crickles estimate of your Lactate Threshold Heart Rate (LTHR) is calculated adaptively from your Strava data and applied consistently.

You’ll also notice that we have reverted to a light colour scheme for the Navigator and Crickles Charts. The Activities table on the Navigator works much better this way, and sometimes it’s just good to have a change.

3 quick ways to use Crickles

If you’re new to Crickles you can begin by using it for these three quick checks:

Check 1: Gauge your cardiac stress

On the landing page [Relative CSS] of the Navigator select your name in the Athlete: dropdown to get a screen like this:

Navigator

The green bar shows you (me in this example) and where you rank amongst Crickles athletes for accrued cardiac stress over the past six weeks. This is based on activities you’ve entered on Strava with a heart rate monitor. If you’re way over on the right hand side you should be aware that you’re taking on a higher cardiac load than most other Crickles athletes. If you’re towards the left hand side you’re taking on less than the others (assuming that you regularly use a HR monitor and upload your activities).

Personally, I aim to be about where I am here: towards the right but not bang up at the end.

Check 2: Gauge your event readiness

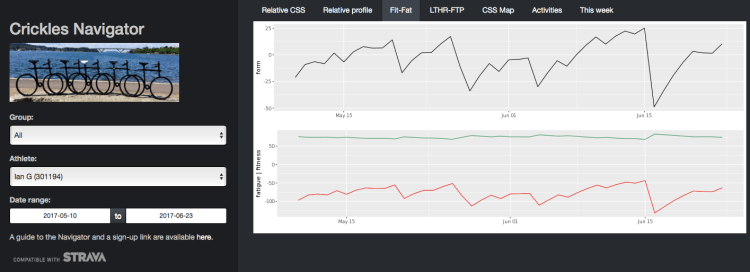
If you have a race or special event coming up in the next few days, go to the Fit-Fat tab on the Navigator to see a page that looks like this:

fitfat

Focus on the black graph: this shows Form. If you’ve been holding at or above about 10 for a few days and you’re now hitting 20-25 you’ll be in great shape for your event. If you’re in negative numbers you’re under-recovered. It’s normal to have negative Form numbers during training but tapering prior to an event enables the Fatigue (the red line) to fall away while Fitness (the green line) can remain high. Form is the difference between the two.

Obviously, if you’ve haven’t been doing any training a taper period won’t help!

Check 3: Compare a specific activity with a friend

If you have someone you exercise with who is also on Crickles, whenever you do the same activity together you can compare your efforts using Crickles Activity Charts.

Again, select yourself from the Athlete dropdown then select the Activity that you did with your training partner. Next, check the Compare another? box and choose your training partner and their record of the same activity. At this point the Metric dropdown will be populated with the set of metrics that you both have available.

chartsIn this example, Sean and I both used HR monitors and power meters so I could select altitude, cadence, kmh, heartrate or watts. Here, I’ve selected heart rate.

You may prefer to choose Distance rather than Time for the x-axis if you didn’t go round together. Here, I’ve checked the Smooth? box too to give a clearer picture.

This enables you to see where you and your partner were putting in relatively more/less effort. (In the example shown, I started off harder then my ride partner, Sean, put in a big effort on the hills in the middle of the ride while I took advantage of a pace car.)

***

If you’d like more info on any of these topics or if you have any questions or difficulties, please get in touch through the Contact page.

Crickles Activity Charts

It’s great to have charts of activity data on Strava and Garmin Connect but there are often times when you want extra capabilities. In particular, it can be useful to compare your efforts at the same event over time or to compare your performance at an event with others who did it with you. Crickles Activity Charts are specially developed for such comparisons. You can find them at charts.crickles.org and they work similarly to the Navigator.

First, choose yourself (or someone else) from the Athlete list and then choose the date range over which you want to search for activities here:

charts_top

The Date range and other controls work as described on the How to notes for the Navigator. Once you’ve picked an Athlete and a Date range the Activity drop-down will be populated appropriately. Note that activities flagged as private will not appear for selection.

Once you’ve chosen an activity two new fields will appear:

charts_metric

One is a View on Strava link; if you choose this the activity selected will appear in Strava in a new window enabling you to confirm that it’s the one you meant to choose and to see context in Strava. The other new field is a drop down list called Metric showing you what graphable data is available for the activity. In this example you can choose from altitude (which is nearly always there) and is measured in metres, cadence (in RPM), heart rate (in BPM), speed (given as kph) and power (given as watts).

This list changes from activity to activity – for example, watts requires you to have used a power meter.

Once you’ve chosen a metric you can also show how you want it to be charted using the x-axis and the Smooth? controls. For comparisons, the x-axis settings of distance and histogram are typically most helpful.

charts_x.pngThe Smooth? control is especially useful for power data, which is noisy. It’s also useful for fields such as kmh and heartrate when a comparison is being made.

Note that Smooth? will transform a histogram into a density plot.

To compare activities you simply check the Compare another? box under the first activity. This then causes a second set of controls for Athlete, Date range and Activity to appear. If you want to compare two of your own activities from different days you just select yourself as both the Athlete and the Second athlete.

Here’s an example of my own, comparing a recent 10 mile effort round Regents Park with a similar effort from last summer. The first activity is shown in blue and the second is shown in pink.

Looking at smoothed power shows that my wattage is quite a bit down:

loops_power.png

(If you’re familiar with power plots you’ll be struck by how little noise there is on this chart – normally power (viewed on a graph) continually oscillates a lot around what we might imagine to be the true signal.)

Second, we can look at a density plot of heart rate on the same two rides:

loops_hr

This shows that on the more recent ride my heart rate was centred on a 160-165 range whereas last year it was rising to the 170-175 bpm range for much of the ride.

The purpose of this example is not to propose that others should choose to ride at lower heart rate and power but to illustrate how these charts can be used to gain insights on your data. You can equally use the same functionality to compare the speeds of two competitors over the same parcours, or even – by charting altitudes – to compare the barometric/mapping fidelity of two devices.

Although not an app, Crickles Charts work well on an iPhone in the same way as the Navigator, as described here.

Only activities from 1/1/2017 are currently available for these charts – please get in touch if you’d like to select from earlier activities.

Improvements to Navigator Activities

If you’ve looked at the Activities page on the Navigator recently you will have noticed some improvements.

Layout and organisation

The columns are centred now, where appropriate, making it easier to read, especially for numeric fields. Also, activities are, by default, sorted by Date with the most recent at the top. It’s also still possible to re-sort, as explained in Using the Crickles Navigator.

It’s now also easier to search through your activities using the Search box. For example, I find this helpful if I want to compare my “Park Loops” rides.

Normalised Power

Normalised Power is now shown for each of your cycling rides where you used a power meter.

View in Strava

You can now also open an activity in Strava from the link in the Strava column.

PLEASE NOTE

The old link to the Navigator (at https://crickles.shinyapps.io/athlete_css_table/) has been online until just now but has not benefitted from any recent upgrades. I have now deleted it as an encouragement to switch to the current version at navigator.crickles.org. There was no functionality in the old version that is not also in the new one.